A Simple Guide On How Guitar Amplifiers Work

An electric guitar can make a sound without an amplifier, but that sound is usually quiet, thin, and difficult to hear across a room. A guitar amplifier takes the small electrical signal created by the guitar’s pickups, strengthens it, shapes its tone, and sends it to a speaker that turns it into the loud sound musicians recognize.

A guitar amplifier does much more than make a guitar louder. It helps create the instrument’s personality. The same guitar can sound clean, warm, bright, gritty, heavy, or distorted depending on the amplifier, its settings, and how hard the player pushes the circuit.

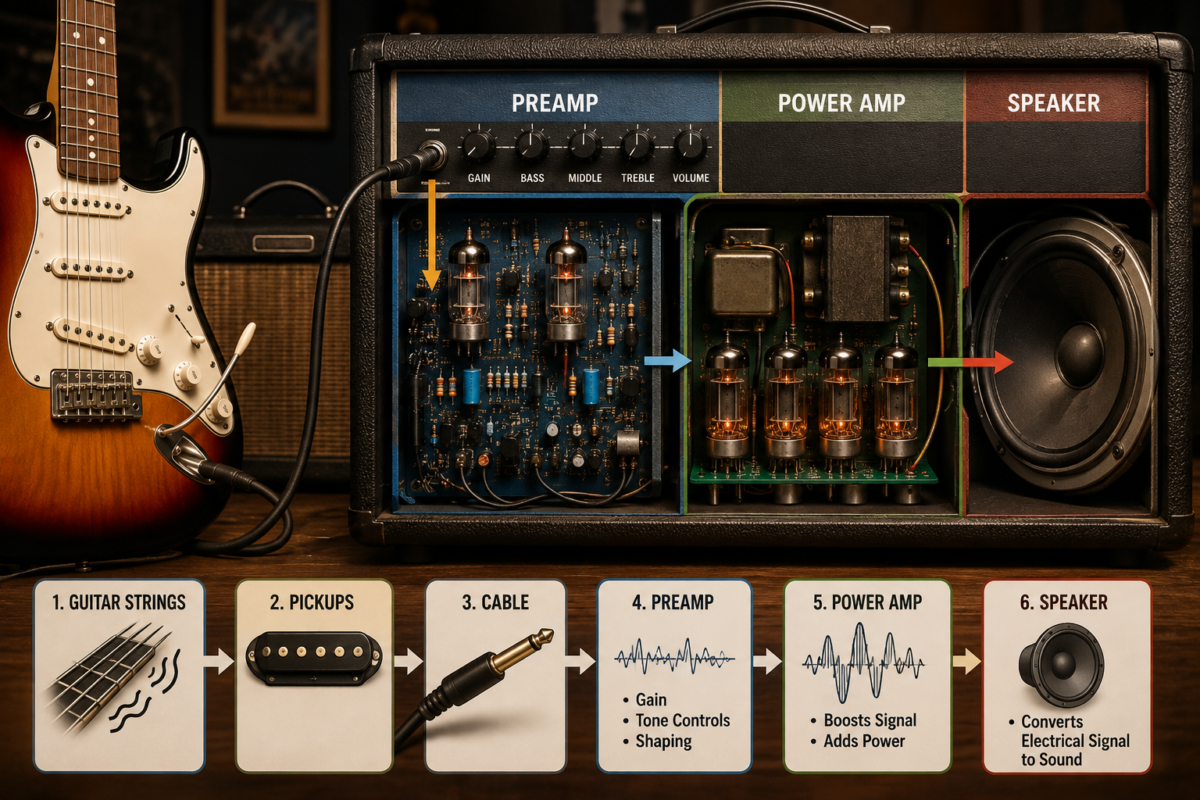
The basic signal path is simple:

Guitar strings → pickups → cable → preamp → tone controls → power amp → speaker → sound

Let’s look at what happens at each stage.


What a Guitar Pickup Does

Before a guitar amplifier can do anything, the guitar must create an electrical signal. This is the job of the pickups.

Electric guitar strings are usually made from magnetic metal. A pickup contains magnets wrapped with a coil of thin copper wire. When a metal string vibrates above the pickup, it disturbs the pickup’s magnetic field. That movement creates a small changing electrical signal in the coil.

This signal follows the same pattern as the vibrating string. If you play a low note, the signal oscillates at a lower frequency. If you play a high note, it oscillates at a higher frequency. The strength of the signal also changes depending on how hard you pick the string.

The pickup does not produce a powerful signal like the one needed to drive a speaker. It produces a relatively weak signal that carries the basic information about your playing:

  • The pitch of the note.
  • The volume of the note.
  • The timing of the note.
  • The attack created by your pick or fingers.
  • Some of the tonal character of the guitar.

Single-coil and humbucking pickups create different types of signals. Single-coil pickups often produce a bright, clear, and sharp tone, while humbuckers generally produce a thicker and fuller sound. However, the amplifier has a major influence on the final result.

When you plug the guitar cable into the amplifier’s input, this small pickup signal enters the first major section: the preamp.


How the Preamp Shapes the Sound

The preamp, or preamplifier, is the first active section inside most guitar amplifiers. Its main job is to boost the weak signal from the guitar and prepare it for the power amplifier.

The preamp is also where much of the amplifier’s character is created. It contains gain stages, tone controls, equalization circuits, and sometimes built-in effects. The preamp helps determine whether an amplifier sounds clean, warm, bright, compressed, gritty, or aggressive.


The Gain Control

The gain control determines how strongly the guitar signal is pushed through the preamp.

At a low gain setting, the signal remains relatively clean. The amplifier increases the signal without changing its shape very much. This produces a clear sound with good note separation.

As you increase the gain, the signal becomes stronger. Eventually, it may become too large for a particular circuit to reproduce accurately. The peaks of the waveform are compressed or clipped. This creates overdrive or distortion.

That familiar crunchy guitar sound is often produced by deliberately overloading one or more preamp stages. The result can range from mild bluesy breakup to thick, high-gain metal distortion.

Gain and volume are not always the same thing. Gain controls how hard the preamp is driven, while the master volume controls how loud the signal becomes later in the amplifier. You can have high gain at a relatively low volume, or low gain at a loud volume.


The Tone Controls

Most guitar amplifiers include bass, middle, and treble controls. These controls form part of the tone section, often called the tone stack.

The bass control affects low frequencies. Increasing it can make the sound deeper and fuller, but too much bass may make the tone muddy.

The middle control affects the central range of frequencies where much of the guitar’s body and clarity are found. Reducing the mids can create a scooped sound, while increasing them can help the guitar stand out in a full band mix.

The treble control affects high frequencies. More treble can add brightness, bite, and definition. Too much, however, may make the sound harsh or unpleasant.

Some amplifiers also include presence, resonance, contour, or bright switches. These controls may operate in different parts of the circuit and can affect the overall response of the amplifier.


Why the Preamp Matters

The preamp is not simply a volume booster. It decides how the guitar signal is shaped before it reaches the power amp. This is why two amplifiers with the same wattage can sound completely different.

One amplifier may have a bright and glassy preamp, while another may produce thick midrange and early overdrive. The design of the circuit, the components used, and the way the controls interact all contribute to the amplifier’s sound.

After the signal has been boosted and shaped by the preamp, it moves to the power amplifier.


How the Power Amp Makes the Signal Strong

The power amplifier is responsible for increasing the signal’s power to a level that can drive a speaker.

The preamp creates and shapes the tone, but its output is still not powerful enough to move a large speaker cone. The power amp takes that processed signal and produces a much stronger version of it. This stage uses energy from the amplifier’s power supply to create enough electrical power for the speaker.

The master volume is commonly connected to this part of the signal path, although the exact design varies between amplifiers.

When the power amp is operating within its limits, it reproduces the preamp signal with greater strength. When it is pushed hard, the power amp itself can begin to compress and distort the sound.

This type of distortion can feel different from preamp distortion. Power amp overdrive is often described as more open, responsive, and dynamic. It may become louder and more distorted when the player picks harder, then clean up when the player plays softly.

In a traditional tube amplifier, the power section may also produce compression and a temporary response known as sag. Sag happens when the power supply voltage briefly drops under heavy demand. Many guitarists enjoy the softer feel and natural response this can create.


How the Speaker Turns Electricity Into Sound

The speaker is the final major stage of a guitar amplifier. It changes the powerful electrical signal from the power amp into air movement that your ears detect as sound.

A typical guitar speaker contains a cone, voice coil, magnet, and suspension system. When the amplified electrical signal reaches the voice coil, the coil interacts with the magnetic field. This causes the coil and attached cone to move back and forth.

As the cone moves, it pushes and pulls the surrounding air. These changes in air pressure travel through the room as sound waves.

The speaker does not reproduce every frequency equally. It has its own response, character, and limitations. This makes the speaker an important part of the guitar tone rather than a neutral delivery system.

A guitar speaker may add midrange focus, soften high frequencies, compress certain notes, or respond differently depending on the volume. The speaker cabinet also affects the sound by influencing resonance, projection, and bass response.

This is why changing a speaker can transform an amplifier even when the electronic circuit remains the same.


Tube, Solid-State, and Modeling Amplifiers

Guitar amplifiers use different technologies to boost and shape the signal. The three most common categories are tube, solid-state, and modeling amplifiers.

Tube Amplifiers

Tube amplifiers use vacuum tubes, also called valves, in their preamp and power amp sections. A vacuum tube controls the flow of electrons through a vacuum, allowing it to amplify the guitar signal.

Tube amplifiers are popular because of the way they respond when played. Many musicians describe them as warm, lively, touch-sensitive, and dynamic. They can remain clean at lower levels and gradually develop natural compression and overdrive as they are pushed.

Different tubes and circuit designs create different responses. Some tube amplifiers are known for sparkling clean tones, while others are designed for thick overdrive and powerful distortion.

Tube amplifiers also have disadvantages. They are often heavier, more expensive, and more fragile than other types. The tubes eventually wear out and may need replacement. Tube amplifiers also generate heat and usually require more care during transport.

A tube amplifier should never be operated incorrectly without a proper speaker load. If a separate tube amplifier head is used with a cabinet, the amplifier and cabinet must be connected correctly. An impedance mismatch can damage the amplifier.

Solid-State Amplifiers

Solid-state amplifiers use transistors and other semiconductor components instead of vacuum tubes.

They are typically lighter, more affordable, and more reliable than tube amplifiers. They can also produce a consistent tone without requiring regular tube replacement.

Solid-state circuits can provide clean, clear sounds with plenty of volume. Some are designed to remain clean even when played loudly. Other models use special circuits to imitate the response of an overdriven tube amplifier.

Older solid-state amplifiers sometimes developed a reputation for harsh distortion when pushed too far. Modern designs have improved significantly, and many solid-state amplifiers are valued for their reliability, clean tone, and practical features.

Modeling Amplifiers

Modeling amplifiers use digital signal processing to recreate the behavior of different amplifiers, speaker cabinets, microphones, and effects.

Inside the amplifier, software analyzes and processes the guitar signal. Instead of relying on one physical preamp and power amp design, a modeling amplifier may offer many virtual choices.

A single modeling amp might imitate classic clean amplifiers, British-style crunch, modern high-gain sounds, bass amps, acoustic preamps, and effects such as delay, reverb, chorus, and tremolo.

Modeling technology is useful for guitarists who need several sounds in one unit. It is also convenient for practice, recording, and performing with headphones or a direct connection to a sound system.

The quality of modeling amplifiers varies, but modern digital systems can produce convincing results. Many units also allow players to save presets and control sounds with footswitches.

Hybrid Amplifiers

Hybrid amplifiers combine different technologies. For example, an amplifier may use a tube in the preamp and a solid-state power amp. Another may use a digital modeling preamp with a traditional power section.

Hybrid designs aim to combine selected advantages, such as tube-like tone, lower weight, greater reliability, or a wider range of sounds.

Combo Amps and Separate Rigs

A combo amplifier includes the amplifier electronics and speaker in one cabinet. It is usually the simplest option for beginners and players who want an easy setup.

You connect the guitar, plug in the amplifier, adjust the controls, and start playing. Combo amps are available in small practice sizes and powerful stage models.

A separate head-and-cabinet system places the amplifier electronics in one unit and the speaker cabinet in another. This arrangement allows players to combine different heads and cabinets.

A head may offer the desired preamp and power amp character, while a cabinet may provide a particular speaker configuration. A setup could include one speaker, two speakers, or four speakers.

Separate rigs can be flexible, but they require more attention. The head and cabinet must be compatible, especially when using a tube amplifier. The amplifier’s output impedance should match the cabinet’s rated impedance as closely as the manufacturer recommends.


What Guitar Amp Watts Mean

Wattage describes the amplifier’s power output, not an exact measurement of loudness.

A higher-wattage amplifier can generally produce more clean headroom before its power section begins to distort. A lower-wattage amplifier may reach power amp breakup at a lower volume, which can be useful for home recording or small performances.

More watts do not automatically mean a better amplifier. A small amplifier can be ideal for practice, while a larger amplifier may be better for a loud band or a large venue.

Speaker efficiency, cabinet design, room size, and the drummer’s volume all affect how loud an amplifier feels. A 20-watt tube amplifier can be surprisingly loud, while a 50-watt amplifier may not sound twice as loud to the listener.

This is because perceived loudness does not increase in a simple one-to-one relationship with wattage. Choosing the right power level is usually about the amount of clean volume, desired breakup, portability, and playing environment.


Why Guitar Amps Distort

Distortion happens when the amplifier is asked to reproduce a signal beyond what part of its circuit can handle cleanly.

Imagine a smooth wave entering the amplifier. If the signal becomes too large, the circuit may flatten the tops and bottoms of the wave. This changes the original shape and adds extra harmonics.

Those added harmonics create the sound of overdrive and distortion.

Distortion can occur in several places:

  • The preamp may clip when the gain is turned up.
  • The power amp may distort when the master volume is raised.
  • The speaker may compress or break up at high volume.
  • A pedal may intentionally distort the signal before it reaches the amplifier.

The type of distortion depends on the circuit and how it clips the signal. Gentle clipping can sound smooth and warm, while abrupt clipping can sound aggressive and sharp.


What Effects Loops Do

Many guitar amplifiers include an effects loop. This provides a connection between the preamp and power amp sections.

Instead of plugging every effect into the amplifier’s main input, some effects can be placed in the loop. Time-based effects such as delay and reverb often sound clearer there, especially when the amplifier’s preamp is producing heavy distortion.

A typical signal path may look like this:

Guitar → overdrive pedal → amplifier input → preamp distortion → effects loop → delay or reverb → power amp → speaker

Not every guitarist needs an effects loop. Some players prefer running every pedal into the front of the amplifier. The best choice depends on the amplifier, effects, and desired tone.


Why the Same Settings Sound Different

An amplifier’s controls do not work in isolation. The guitar, pickups, strings, cable, pedals, room, speaker, cabinet, and playing technique all influence the final sound.

A humbucker may push the preamp harder than a lower-output single-coil pickup. A bright guitar may require less treble than a dark-sounding guitar. A closed-back cabinet may produce a tighter response than an open-back cabinet.

Your playing also matters. Picking near the bridge usually creates a brighter sound, while picking closer to the neck can produce a warmer tone. Playing softly may keep the amplifier clean, while striking the strings harder may create more overdrive.

This interaction is one reason guitar amplifiers feel like part of the instrument. They do not simply make a finished sound louder. They react to the signal and help shape what the guitarist expresses.


A Simple Example of the Full Process

Suppose you play a note on an electric guitar.

First, the string vibrates inside the magnetic field of the pickup. The pickup converts that vibration into a small electrical signal.

Next, the signal travels through the guitar cable and enters the amplifier’s preamp. The preamp boosts the signal and adjusts its tone according to the gain, bass, middle, treble, and other controls.

If the gain is high, the preamp may clip the signal and create distortion. If the gain is low, the signal may remain clean.

The shaped signal then reaches the power amp. The power amp increases the signal’s power so it can move the speaker.

Finally, the speaker cone moves back and forth in response to the electrical signal. The movement pushes air, creating sound waves that reach your ears.

That entire process happens almost instantly every time you play a note.


Making Guitar Amplifier Works

A guitar amplifier works by taking a weak electrical signal from the guitar’s pickups and turning it into a shaped, powerful sound. The preamp controls much of the tone and gain, the power amp provides the energy needed to drive the speaker, and the speaker converts that electrical energy into audible sound.

Tube, solid-state, modeling, and hybrid amplifiers perform the same basic job but respond in different ways. Their circuits, speakers, cabinets, controls, and power levels create different playing experiences.

Understanding this signal path makes amplifier controls easier to use. Gain affects how hard the preamp is driven, tone controls adjust the frequency balance, master volume controls overall loudness, and the speaker delivers the final voice of the rig.

Once you understand how each stage works, choosing settings becomes less mysterious. You can hear what the amplifier is doing, make purposeful adjustments, and build guitar tones that fit your playing style.
What Are Common Amplifier Problems?

Amplifiers are designed to make audio louder, fuller, and more powerful. Whether you use one in a home stereo, car audio system, guitar setup, PA system, or home theater, problems can appear over time. Sometimes the issue is as simple as a loose cable or incorrect setting. In other cases, the amplifier may have overheating, power supply, speaker, or internal component problems.

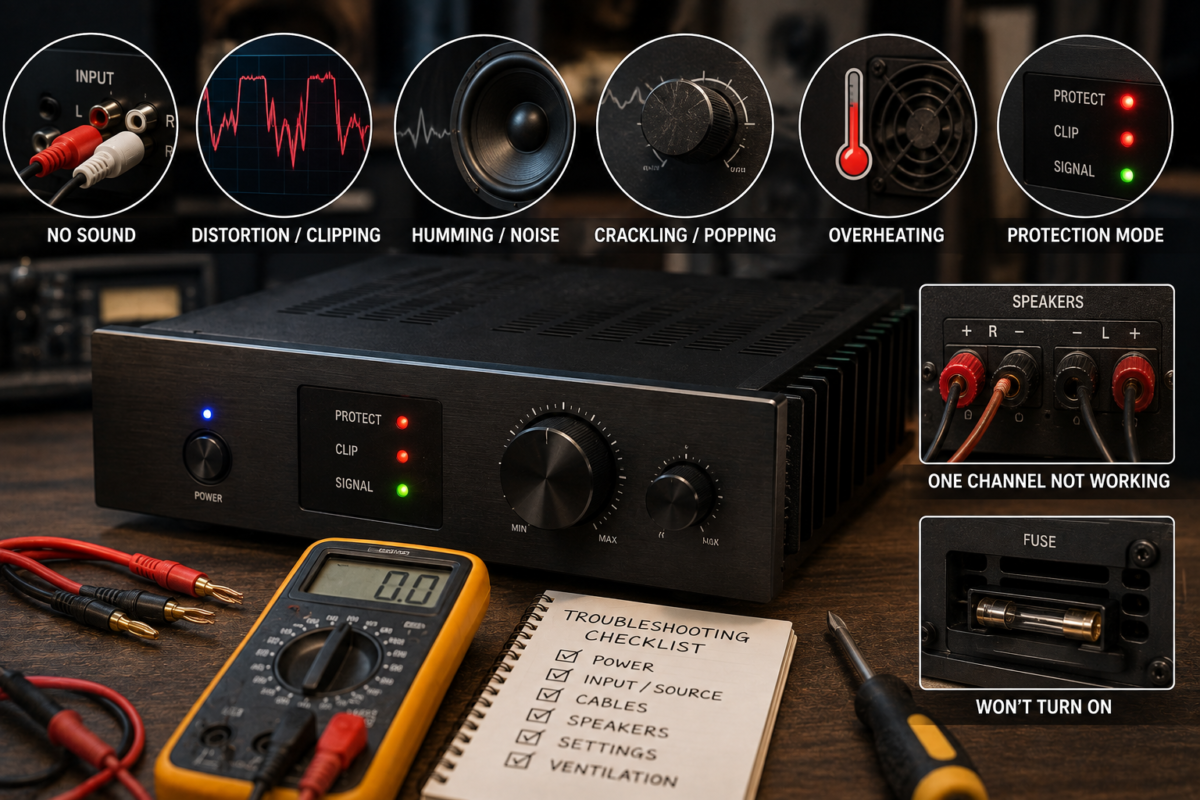
The most common amplifier problems include no sound, distorted audio, humming, crackling, overheating, sudden shutdowns, protection mode, low volume, and one channel not working. The good news is that many issues can be identified with a few simple checks before professional repair is needed.

1. The Amplifier Has No Sound

One of the most frustrating amplifier problems is complete silence. The amplifier may turn on normally, but no audio comes from the speakers. This can happen because of a wrong input selection, disconnected cables, muted equipment, or a problem with the speaker wiring.

Start by checking the easiest possibilities:

  • Make sure the amplifier is turned on.
  • Confirm that the correct input source is selected.
  • Check whether the source device, such as a phone, mixer, television, or music player, is producing sound.
  • Turn up the amplifier’s volume gradually.
  • Check whether the system has a mute function enabled.
  • Inspect every audio cable and speaker wire.
  • Make sure the speakers are connected to the correct output terminals.

A loose RCA cable, damaged auxiliary cable, disconnected optical cable, or faulty speaker wire can stop audio from reaching the amplifier or speakers. Try using a different input and cable to determine whether the problem follows the cable or stays with the amplifier.

If the amplifier has separate gain, master volume, and channel controls, check each one. A channel gain turned all the way down can make the amplifier appear to be defective even when it is working properly.

Some amplifiers also include a speaker selector, headphone mode, standby mode, or zone control. If the system is set to the wrong zone or remains in headphone mode, the main speakers may not produce sound.

If there is still no sound after checking the connections and settings, disconnect the amplifier from the speakers and inspect the fuse, power indicator, and protection light. A professional should examine the unit if it has power but produces no output from any input.

2. Distorted or Clipped Sound

Distortion occurs when the audio signal becomes harsh, fuzzy, compressed, or unpleasant. Music may sound acceptable at low volume but become rough when the volume is increased. In many cases, distortion is caused by pushing the amplifier beyond its limits.

Clipping happens when an amplifier tries to produce more power than it can safely deliver. Instead of reproducing the audio waveform smoothly, the amplifier cuts off the peaks of the signal. This creates a harsh sound and may damage speakers if it continues for a long time. Excessive input levels, poor gain settings, and impedance problems are common causes of clipping.

To reduce distortion, try these steps:

  1. Lower the amplifier’s gain.
  2. Reduce the volume on the source device.
  3. Avoid turning every volume control to maximum.
  4. Check whether the mixer, preamp, or audio interface is clipping.
  5. Use a speaker load that matches the amplifier’s recommended impedance.
  6. Test the system with another audio source.

Gain and volume are not always the same thing. Gain controls how strongly the input signal enters the amplifier, while the volume or master control adjusts the final output level. If the input gain is set too high, distortion can occur even when the master volume is not very loud.

A damaged speaker can also create distortion. Listen carefully to determine whether only one speaker sounds bad. If the distortion follows the speaker when it is connected to another channel, the speaker may be damaged. If the distortion remains on the same amplifier channel, the amplifier or cable may be responsible.

3. Humming, Buzzing, or Electrical Noise

A low humming or buzzing sound is another common amplifier problem. The noise may be heard even when no music is playing. It can come from power cables, grounding issues, faulty audio cables, nearby electronics, or a ground loop.

A ground loop can occur when connected devices use different electrical paths to ground. This may create a steady hum through the speakers. Poorly shielded or damaged cables can also pick up electrical interference from power adapters, computer equipment, lighting systems, and other devices.

To locate the source of the noise:

  • Turn the amplifier volume down and listen.
  • Disconnect the input cables while leaving the speakers connected.
  • Reconnect each device one at a time.
  • Move audio cables away from power cables.
  • Try another input cable.
  • Test the amplifier with a different power outlet.
  • Disconnect nearby electronic devices temporarily.

If the hum disappears when the input cables are removed, the problem may be connected to the source device or cable rather than the amplifier itself. If the hum remains with nothing connected to the inputs, the amplifier may have an internal power supply or grounding fault.

Avoid randomly removing the ground connection or using unsafe electrical adapters. Grounding is an important safety feature. If the hum is strong, the amplifier becomes hot, or you notice sparks or a burning smell, turn it off and seek professional assistance.

4. Crackling, Popping, or Intermittent Sound

Crackling and popping noises may occur when turning a knob, changing the volume, moving a cable, or playing music. Intermittent sound can be especially difficult to diagnose because the amplifier may work normally for several minutes before the problem returns.

A noisy volume or tone control may have dust, oxidation, or wear inside it. If the crackling happens only when a knob is turned, the control may need cleaning or replacement. Do not spray ordinary household cleaners inside the amplifier. Use products intended for electronic controls, and follow the manufacturer’s instructions.

Loose connections are another common cause. Inspect the following:

  • Speaker terminals.
  • RCA, XLR, or instrument cables.
  • Input and output jacks.
  • Power connections.
  • Fuse holders.
  • Internal connectors, if a qualified technician is inspecting the unit.

If moving a cable causes the sound to cut in and out, replace the cable first. Cable replacement is usually safer and less expensive than opening the amplifier.

Crackling that occurs continuously, even when no controls are being moved, may indicate a failing component. Aging capacitors, damaged transistors, loose solder joints, and failing output devices can all cause unstable audio. Internal repairs should be handled by a trained technician because amplifiers can contain dangerous voltages even after they have been switched off.

5. The Amplifier Overheats

Amplifiers naturally produce heat, especially when operating at high volume. However, excessive heat is a warning sign. An amplifier that becomes extremely hot, shuts down, smells like burning electronics, or repeatedly enters protection mode may have a cooling, load, or electrical problem.

Poor ventilation is one of the most common causes of overheating. An amplifier should not be placed in a sealed cabinet, directly against a wall, under heavy equipment, or near a heat source. Dust blocking the fan, vents, or heat sink can also restrict airflow. Proper ventilation helps the amplifier remove heat during operation.

Possible causes of overheating include:

  • Blocked ventilation openings.
  • A failed or dirty cooling fan.
  • A speaker load below the amplifier’s safe impedance.
  • Prolonged operation at maximum volume.
  • Clipping caused by excessive gain.
  • A damaged speaker or shorted speaker wire.
  • High room temperature.
  • An internal electronic fault.

Turn the amplifier off and allow it to cool before testing it again. Check that the vents are open and that the fan spins freely, if the unit has one. Clean dust from the outside using appropriate methods, but do not open the amplifier unless you know how to work safely with electronic equipment.

Do not continue using an amplifier that overheats repeatedly. Heat can damage internal components and connected speakers. If the amplifier becomes hot even at low volume with the correct speaker load, professional diagnosis is recommended.

6. The Amplifier Goes Into Protection Mode

Many modern amplifiers have a protection circuit. This circuit may turn off the output or illuminate a protection indicator when it detects overheating, a short circuit, excessive current, low voltage, or a serious internal fault.

Protection mode is not usually a random malfunction. It is the amplifier’s way of preventing additional damage. Common causes include incorrect speaker impedance, shorted speaker wires, faulty speakers, unstable power, overheating, and internal output-stage problems.

To troubleshoot protection mode safely:

  1. Turn the amplifier off.
  2. Allow it to cool for several minutes.
  3. Inspect the speaker wires for loose strands touching another terminal or metal surface.
  4. Check that the speakers match the amplifier’s minimum impedance rating.
  5. Disconnect the speaker wires and turn the amplifier on briefly.
  6. If the protection light disappears, inspect the speakers and wiring.
  7. Reconnect one speaker or channel at a time.

If the amplifier remains in protection mode with the speakers disconnected, the issue may be inside the amplifier. Do not repeatedly power-cycle it or replace the fuse with one that has a higher rating. The correct fuse protects the amplifier and wiring from excessive current.

In car audio systems, low battery voltage, weak grounding, undersized power cables, and poor connections can also trigger protection mode. Check that the amplifier receives stable power and has a solid ground connection. If you are not comfortable testing electrical voltage, have the system checked by a qualified installer.

7. Only One Channel Works

When sound comes from one speaker but not the other, the problem may be caused by a cable, source setting, speaker, or amplifier channel. It is best to test the system methodically instead of assuming that the amplifier is defective.

First, check the balance control on the source device and amplifier. The balance may be set completely to the left or right. Next, swap the left and right input cables. If the silent channel changes sides, the source or input cable may be faulty.

You can also swap the speaker connections, provided the amplifier and speakers are compatible. If the same speaker remains silent, inspect that speaker and its wire. If the problem stays with the same amplifier output, that channel may have an internal fault.

A failed fuse, damaged output transistor, bad relay, or loose solder connection can cause one channel to stop working. These issues usually require testing equipment and technical experience. Avoid connecting and disconnecting speaker wires while the amplifier is powered on.

8. Low Volume or Weak Output

An amplifier may turn on and produce sound, but the volume may be much lower than expected. This can result from incorrect gain settings, a weak source signal, poor cables, incorrect speaker connections, or a partial internal failure.

Check the entire signal chain from beginning to end. Confirm that the source device is not muted or set to a very low level. Inspect the amplifier’s input sensitivity, gain, master volume, and channel controls. If the amplifier is connected to a mixer or audio interface, check the output level on that device as well.

Speaker wiring can also affect output. A loose connection, reversed wiring, or incorrect bridge configuration may reduce performance. In car and PA systems, speakers connected with the wrong impedance can make the amplifier reduce output or shut down to protect itself.

Try another source and another speaker cable. If the output remains weak on every input and channel, the amplifier may have a power supply or output-stage problem. A technician can measure the unit and determine whether repair is practical.

9. The Amplifier Will Not Turn On

When an amplifier does not power up, begin with the power source rather than opening the unit.

Check the following:

  • Confirm that the outlet or vehicle power source works.
  • Inspect the power cord for damage.
  • Make sure the power switch is fully engaged.
  • Check the amplifier’s fuse.
  • Look for a separate remote-turn-on or standby control.
  • Confirm that the power adapter has the correct rating.
  • Inspect car audio power and ground connections.

A blown fuse may be caused by a temporary power surge, but it can also indicate a deeper fault. Replace it only with the same type and rating specified by the manufacturer. If the replacement fuse blows immediately, stop testing the amplifier. Repeatedly installing new fuses can create a safety hazard and cause further damage.

For car amplifiers, the remote wire must receive the correct turn-on signal. A disconnected remote wire can make the amplifier appear completely dead even when the main power cable is connected.

If the amplifier has no lights, no fan activity, and no response after the basic checks, the power supply, switch, fuse circuit, or internal components may have failed.

10. The Amplifier Shuts Down During Use

An amplifier that cuts out during loud passages may be overheating, clipping, receiving unstable power, or detecting an unsafe speaker load. The timing of the shutdown provides a useful clue.

If the amplifier works again after cooling, overheating is likely. If it shuts down only at high volume or when bass increases, the amplifier may be overloaded or the speakers may have too low an impedance. If it cuts out when the vehicle starts, when a cable moves, or when the system vibrates, inspect the power and speaker connections.

Make sure the amplifier is not being driven beyond its rated output for long periods. Loudness is affected by the amplifier, speakers, room, source level, and system design. Turning up the gain cannot safely compensate for speakers or an amplifier that are too small for the application.

A sudden shutdown followed by a protection light should be treated as a warning. Lower the volume, turn the unit off, and inspect the wiring and ventilation before using it again.

11. Weak Bass or Poor Sound Quality

Sometimes an amplifier works but does not sound right. The audio may have weak bass, thin vocals, harsh treble, or an uneven balance. This does not always mean the amplifier is damaged.

Incorrect tone controls, equalizer settings, crossover controls, and speaker placement can change the sound significantly. In a car audio system, a subwoofer may sound weak because of incorrect phase, wiring polarity, crossover frequency, or enclosure problems. In a home stereo, speakers placed too close to a wall or corner may produce excessive bass rather than weak bass.

Check whether the speaker wires are connected with the correct polarity. If one speaker is wired backward, the speakers can partially cancel each other’s bass, especially when positioned close together. Keep the settings neutral while troubleshooting, then adjust one control at a time.

Test the amplifier with familiar music and a known-good speaker. This helps separate an equipment problem from a recording, streaming, or source-device issue.

How to Prevent Amplifier Problems

Regular care can reduce the risk of common amplifier failures. Keep the unit clean, dry, and properly ventilated. Use speakers with an impedance that falls within the amplifier’s specifications, and avoid operating at maximum volume for extended periods.

Before turning the system on, check that the cables are secure and that the controls are set to a reasonable level. Avoid connecting or disconnecting speakers while the amplifier is powered. Use suitable power cables, fuses, and adapters, especially in car and professional audio installations.

It is also useful to watch for early warning signs, such as unusual heat, intermittent crackling, a burning smell, repeated fuse failure, protection mode, or a new hum. Addressing these symptoms early can prevent a minor connection problem from becoming an expensive repair.

When to Call a Professional

Simple checks can solve many amplifier problems, but internal repairs require caution. Amplifiers can contain high-voltage components that remain dangerous after the power has been disconnected. Do not open the unit if you are unfamiliar with electronic repair or electrical safety.

Professional service is recommended when the amplifier repeatedly blows fuses, stays in protection mode, produces smoke or a burning smell, overheats at low volume, loses an entire channel, or has an internal fault. A qualified technician can test the power supply, output stage, protection circuit, speaker load, and signal path.

In most cases, the fastest troubleshooting method is to start with the basics: power, input selection, cables, speaker wiring, impedance, gain, and ventilation. These checks often reveal the cause without requiring complicated equipment.

What Are the Parts of an Amplifier? A Clear, Friendly Guide

An amplifier is a device that increases the strength of an electrical signal so speakers, instruments, or other devices can produce louder sound. Whether you’re curious about guitar amps, home stereo systems, or audio gear for recording, knowing the main parts of an amplifier helps you understand how sound gets bigger, cleaner, and shaped to your taste. This guide breaks down the essential components, what they do, and how they work together—using simple language and helpful examples.

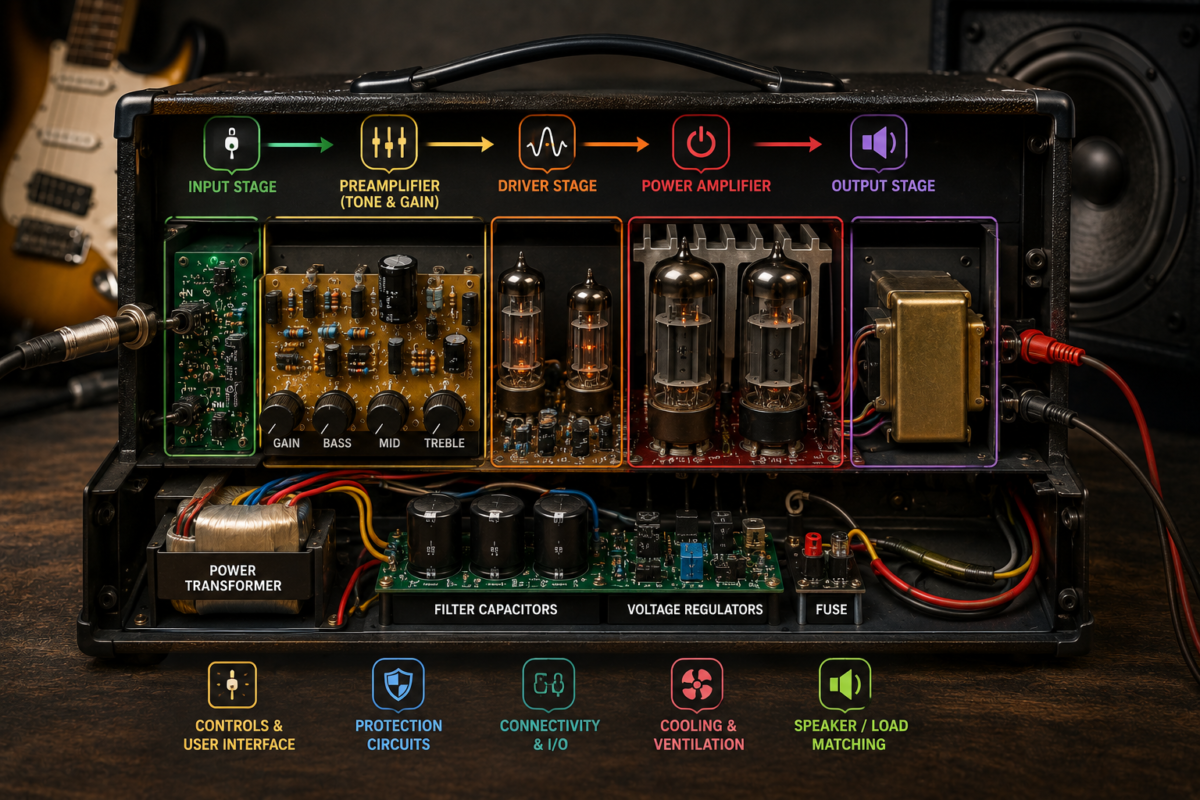
1. Input Stage: Where the Signal Begins

The input stage is the amplifier’s entry point. It receives the weak incoming signal from a microphone, guitar, phone, or audio player and prepares it for amplification.

  • Input jack: The physical connector (1/4″, XLR, RCA, or 3.5mm) where you plug the source.
  • Input buffer: Prevents the signal source from being affected by the amplifier’s circuitry; keeps impedance stable.
  • Preamp controls: Gain/volume and sometimes tone shaping that set initial signal level and character.

Why it matters: A clean, correctly matched input stage prevents noise and distortion right from the start.

2. Preamplifier (Preamp): Boost and Shape

The preamp raises the low-level input signal to a usable level. It often includes tone controls, equalization, and other shaping tools.

  • Gain: Sets how much the signal is amplified at low levels; too high creates distortion.
  • EQ/Tone controls: Bass, mid, and treble adjustments that shape the sound’s frequency balance.
  • Tone stacks and filters: More precise shaping (presence, contour, or mid-scoop) used in guitar amps and hi-fi units.
  • Switches and effects loops: May include overdrive, boost, or a loop to insert external effects between preamp and power amp.

Why it matters: The preamp defines the character of the sound—clean, warm, bright, or distorted—before it goes to powerful amplification.

3. Tone and Signal Processing Sections

Some amplifiers include built-in processing to further shape or modify the sound.

  • Equalizer (graphic or parametric): Adjusts narrow or broad frequency bands for precise tone control.
  • Compressor/limiter: Controls dynamic range, smoothing loud peaks or boosting quiet sounds.
  • Noise gate: Removes unwanted background noise below a set threshold.
  • Effects (reverb, delay, chorus): Add spatial or time-based effects, common in combo amps and modern digital hybrids.

Why it matters: Built-in processing can save you from extra gear, simplify setup, and produce a polished result quickly.

4. Tone Control Circuitry and Tone Stack

A closer look at the tone stack: this is a network of resistors and capacitors that shapes bass, mid, and treble. Guitar amps often use classic tone stacks that produce their recognizable voicing; hi-fi amps use more transparent circuits aimed at faithful reproduction.

  • Passive tone stacks: Shape frequencies without adding gain; rely on the preamp’s level for overall volume.
  • Active tone stages: Use powered circuitry to boost or cut frequencies more aggressively and with less signal loss.

Why it matters: Different tone stacks significantly influence an amplifier’s personality—vintage warmth or modern clarity.

5. Driver Stage: Preparing for Power

The driver stage takes the preamp’s output and readies it for the power section. It provides the voltage/current gain necessary to drive the final amplification devices (transistors or tubes).

  • Driver transistors/tubes: Increase current and sometimes voltage to properly bias the power stage.
  • Phase inverter (in tube amps): Creates opposite-phase signals for push-pull power stages.

Why it matters: The driver stage bridges delicate preamp circuitry and the heavy lifting of the power amp, ensuring stable, low-distortion output.

6. Power Amplifier (Power Amp): The Loudness Engine

The power amp is the part that supplies the electrical energy to drive speakers. It amplifies the signal from the driver stage to a level sufficient to move speaker cones and create audible sound.

  • Output transistors or tubes: Handle high currents and voltages to deliver power to the speakers.
  • Topologies: Class A, AB, D, etc., each with trade-offs for efficiency, heat, and sound character.
  • Heat sinks and cooling: Dissipate heat produced by power components, especially in solid-state amps.

Why it matters: The power stage determines how loud the amp can go, how clean it stays at high volume, and how efficient it is.

7. Output Transformer or Output Stage Components

In tube amplifiers, output transformers match tube circuitry to speaker impedance. In solid-state amps, matching networks and output transistors do the job.

  • Output transformer: Matches high-voltage, low-current tube signals to low-impedance speakers.
  • Speaker output jacks: Connect the amp to speakers; may offer multiple impedance taps (4Ω, 8Ω, 16Ω).
  • Protection circuits: Prevents damage from short circuits or mismatched impedance.

Why it matters: Correct matching ensures maximum power transfer and protects both amp and speakers from damage.

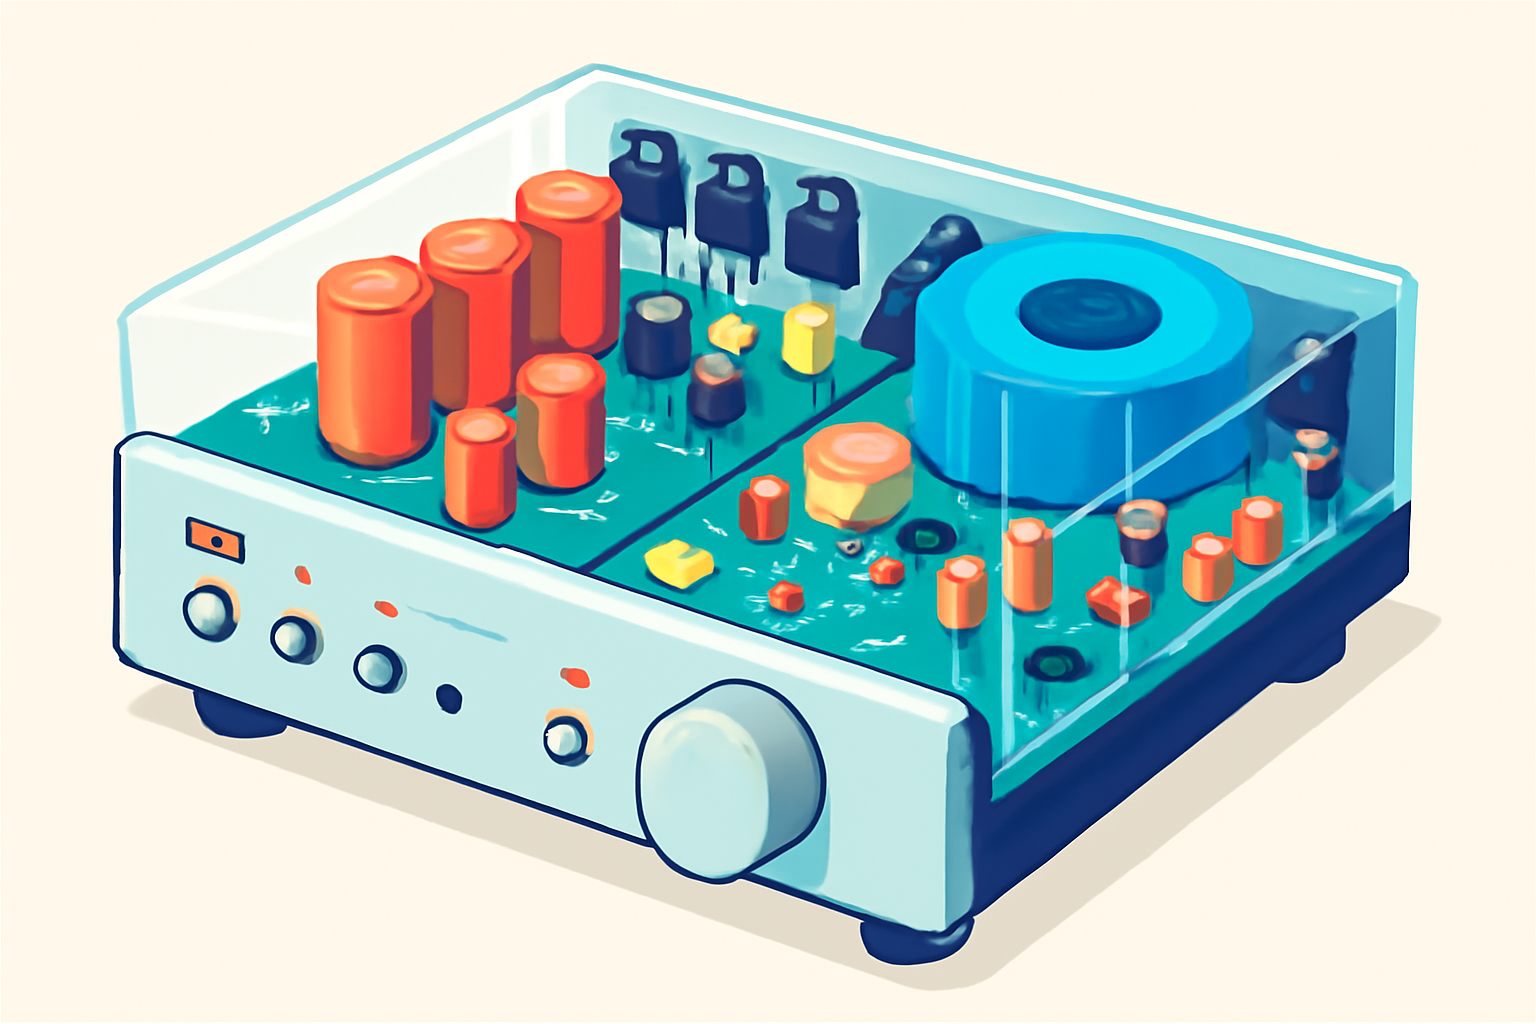
8. Power Supply: The Heartbeat

The power supply provides steady electrical energy for every part of the amplifier. A stable power supply reduces noise and ensures consistent performance.

  • Transformer (in mains-powered amps): Steps the mains voltage up or down.
  • Rectifier: Converts AC to DC.
  • Filter capacitors: Smooth out voltage ripple.
  • Voltage regulators: Provide steady voltages to sensitive circuits.
  • Power switch and fuse: For safe operation and fault protection.

Why it matters: A solid power supply reduces hum, distortion, and performance variability—especially important for tube amps and high-power solid-state designs.

9. Controls and User Interface

These are the external controls and indicators you interact with.

  • Volume and master volume: Control overall loudness and balance between preamp and power amp.
  • Gain vs. Master: Gain sets preamp distortion; master sets final output level.
  • Tone knobs: Bass, mid, treble, presence.
  • Input selectors and channel switches: Switch between clean and lead channels or inputs.
  • Meters and LEDs: VU meters, clipping indicators, and power lights.

Why it matters: Clear, intuitive controls let you dial the sound quickly and avoid unwanted distortion or speaker damage.

10. Cabinets, Chassis, and Physical Components

The physical build affects durability, tone (for speaker cabinets), and cooling.

  • Chassis: Houses electronic components; keeps them grounded and protected.
  • Cabinet (for combo amps): Influences resonance and tonal coloring for speaker-equipped amps.
  • Venting and fans: Ensure heat is safely removed.
  • Grounding points: Important for safety and hum reduction.

Why it matters: A well-built chassis and cabinet reduce noise, protect components, and can subtly influence sound quality.

11. Speakers, Outputs, and Load

An amplifier’s output needs a speaker or load to function properly; matching matters.

  • Speaker drivers: Convert electric power into sound; their size and design affect frequency response.
  • Impedance matching: The amplifier’s output impedance must match the speaker(s) to avoid inefficiency or damage.
  • Line outputs and DI: Send signal to mixers or recording gear without powering speakers.

Why it matters: Correct speaker selection and wiring maximize sound quality and prevent equipment failure.

12. Protection and Safety Circuits

Modern amps include safeguards to extend life and prevent hazards.

  • Thermal protection: Shuts down or reduces power when overheating.
  • Current limiting: Prevents excessive current that could damage components.
  • Short-circuit protection: Detects and isolates faults.
  • Speaker protection relays (in tube and high-end solid-state amps): Delay speaker connection during warm-up to avoid pops.

Why it matters: These systems protect your gear, your speakers, and you.

13. Connectivity and I/O Options

Amplifiers today often include multiple ways to connect and integrate with other gear.

  • Line inputs and outputs: For mixers, audio interfaces, or recording.
  • Headphone jacks: For silent practice or private monitoring.
  • USB and digital I/O: Present in modern amps to interface with software and DAWs.
  • Effects loop (send/return): Places pedals or rack effects between pre and power stages for better tonal control.

Why it matters: Flexible I/O expands how you use the amp—live, studio, or practice—without extra routing headaches.

14. Common Variations by Amplifier Type

Different amplifier types emphasize different parts of the signal chain:

  • Tube amps: Emphasize preamp tubes, output tubes, output transformers, and sag/voicing characteristics. Tone often warmer, dynamic.
  • Solid-state amps: Use transistor-based preamp and power stages, robust power supplies, and efficient cooling. Often cleaner and more reliable.
  • Hybrid amps: Combine tube preamps with solid-state power stages for a mix of warmth and power.
  • Digital/modelling amps: Rely on DSP (digital signal processing), amp modelling, and digital I/O; include less traditional preamp/power hardware but still have input, DSP, and output stages.
  • Power amplifiers (studio/live): Focus on transparent, high-power output with minimal tone shaping; used with separate preamps or mixers.

Why it matters: Knowing the type helps you prioritize which parts to look for when choosing or repairing an amp.

15. Practical Troubleshooting Tips (Quick)

If an amp isn’t working, check these parts first:

  • No sound: Verify input cable/jack, volume, speaker connections, and fuses.
  • Hum or buzz: Check grounding, power supply filter caps, and wiring.
  • Distortion at low volumes: Look at preamp gain settings, dirty pots, or failing tubes.
  • Overheating: Ensure vents are clear, fans run, and load/speaker impedance is correct.

Why it matters: Basic checks often fix common issues without needing professional service.

How the Parts Work Together

In simple terms, the signal flows like this: Input jack → Input buffer → Preamplifier (gain/tone) → Driver stage → Power amplifier → Output (transformer or direct) → Speaker/load. Supporting systems—power supply, cooling, controls, and protection—keep everything stable, safe, and usable. Each section contributes to final volume, tonal character, clarity, and reliability.

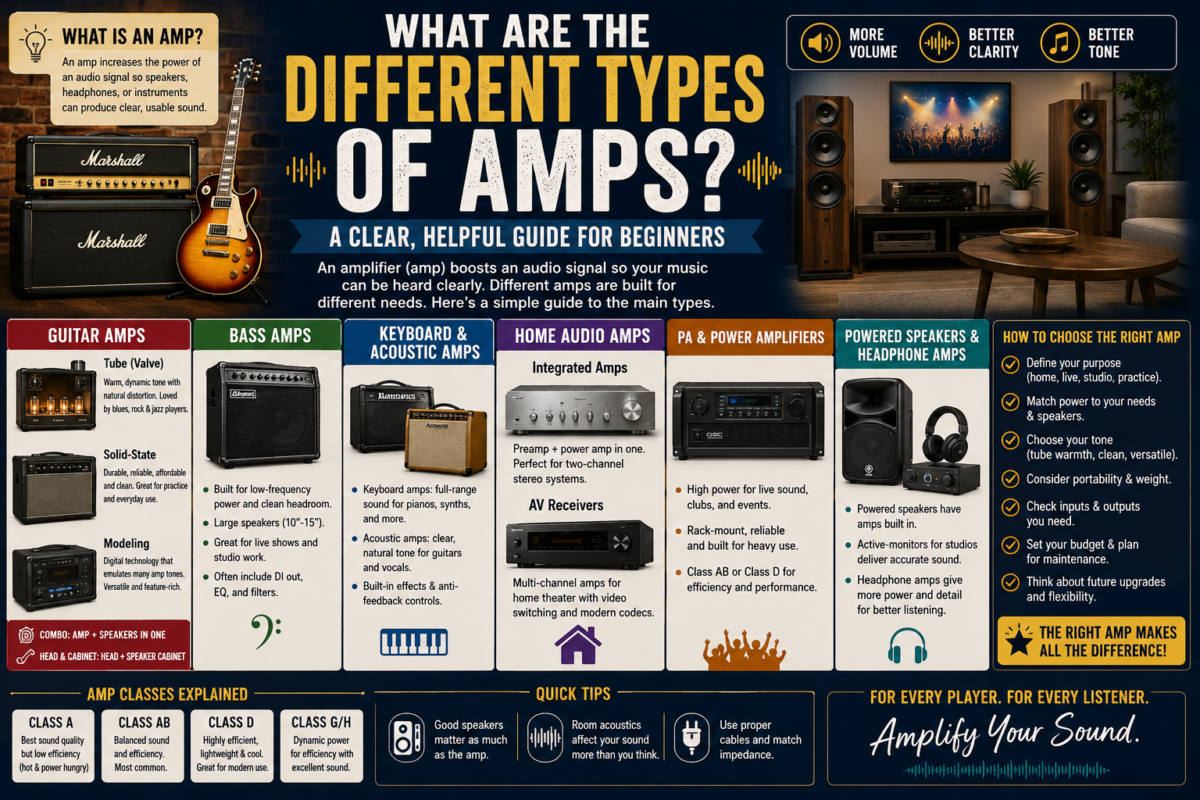
What Are the Different Types of Amps? A Clear, Helpful Guide for Beginners

If you’ve ever shopped for audio gear, watched musicians set up at a gig, or tried to upgrade your home sound system, you’ve probably run into the term “amp” a lot. Short for amplifier, an amp takes a small audio signal and boosts it so speakers, headphones, or instruments can be heard clearly. But not all amps are the same — they come in different designs, sizes, and purposes. This guide explains the main types of amplifiers, what each one does, and how to choose the right amp for your needs. It’s written simply, with a light tone, and focused on answering the questions people ask when searching for informational help.

What is an amplifier and why does it matter?

An amplifier increases the power of an audio signal. Without adequate amplification, sound from a guitar, microphone, or audio player would be too quiet to be useful. Amps influence volume, clarity, tonal character, and how well speakers perform. Different amps are optimized for different tasks — instrument performance, home listening, studio recording, or live sound reinforcement.

Broad categories: analog vs. digital, integrated vs. separate

Before diving into the specific amp types, it helps to understand two basic contrasts:

  • Analog vs. digital: Analog amps use continuous electrical signals and traditional circuitry (tubes or transistors). Digital amps (also called class-D or modeling amps) use digital processing and can be highly efficient and feature-rich.
  • Integrated vs. separate: An integrated amp combines a preamplifier and power amplifier in one box (common in home audio). In professional or hi-fi setups, preamps and power amps are often separate units to provide more control and upgrade flexibility.

Now let’s look at the specific types you’ll encounter.

  1. Guitar amps — tube (valve), solid-state, and modeling
    Guitar amps are a world on their own because players want tone as much as volume.
  • Tube (valve) amps: These use vacuum tubes to amplify the signal. They’re prized for warm, natural-sounding distortion, smooth dynamics, and pleasing harmonic overdrive when pushed. Many blues, rock, and jazz players prefer tube amps for their musical response. Downsides: heavier, require maintenance, can be expensive.
  • Solid-state amps: Use transistor-based circuitry. They’re durable, lighter, more affordable, and require less upkeep. Solid-state amps are often cleaner and more consistent, though earlier designs were criticized for sounding “sterile.” Modern solid-state units can be excellent and are commonly used for practice and budget-conscious players.
  • Modeling amps: Use digital signal processing (DSP) to emulate the sounds of many classic amps and effects. They’re versatile, compact, and ideal for players who need dozens of tones without hauling multiple amps. Modeling amps are popular for home practice, studio work, and versatile gigging. Examples include combos and amp heads with onboard presets and USB connectivity.

Common formats

  • Combo amps: Amp and speaker(s) in one enclosure. Portable and popular for practice and small gigs.
  • Amp heads and cabinets: Head contains the electronics; cabinet holds the speakers. Preferred for stage flexibility and larger setups.
  1. Bass amps
    Bass amplifiers are designed to handle low-frequency content and typically emphasize clean headroom and power rather than distortion.
  • Bass combo and head/cabinet systems: Similar in form to guitar amps but engineered for deep lows and high-power delivery. They often have larger speakers (10–15 inches), EQ suited to bass frequencies, and strong low-end response.
  • Amp features: Compression, notch filters, and DI outputs for sending a clean signal to the PA or recording interface.
  1. Instrument amplifiers beyond guitar and bass
    Amps tailored for keyboards, acoustic guitars, and orchestral instruments address specific needs:
  • Keyboard amps: Full-range speakers and flat frequency response to reproduce synths, pianos, and sample-based sounds accurately. They often include multiple inputs and effects loops.
  • Acoustic amps: Designed to reproduce the natural tone of acoustic guitars and voices with clarity. Many include anti-feedback controls, built-in effects (reverb), and a mix channel for vocals.
  • Acoustic-electric combos: Combine mic/line inputs, EQ, and sometimes a small PA-like functionality for singer-songwriters.
  1. Home audio amplifiers — integrated, stereo, and AV receivers
    Home audio amps aim for accurate music reproduction and ease of use.
  • Integrated amplifiers: Combine preamp and power amp sections in one chassis. They feed passive speakers and usually include volume, tone controls, source switching, and sometimes phono inputs for turntables. Ideal for two-channel music systems.
  • Stereo power amplifiers: Only provide amplification; require a separate preamp or controller. Audiophiles prefer separates for higher fidelity and upgrade paths.
  • AV receivers: Built for home theaters and multi-channel audio. They include surround-sound decoding, video switching, network streaming, and room calibration tools. AV receivers are a central hub for home entertainment systems.
  • Specialized headphone amplifiers: Small units that drive high-impedance headphones better than standard headphone jacks. Audiophiles and studio engineers often use dedicated headphone amps for improved detail and dynamics.
  1. Power amplifiers for PA and professional sound
    These amplifiers deliver high power to large speaker systems in live events, clubs, and houses of worship.
  • Stereo power amps and multi-channel power amps: Built for high continuous output and reliability. They often include bridging modes, protection circuits, and cooling systems.
  • Amplifier types by class: Class AB is common for clean sound and moderate efficiency; Class D is highly efficient and used when weight and heat are concerns (touring rigs, powered speakers).
  • Rack-mount amplifiers: Designed for use in standard 19-inch equipment racks; common for touring, installations, and fixed sound systems.
  1. Powered speakers and active monitors
    These units have amplifiers built into the speaker enclosure, simplifying setup.
  • Active studio monitors: Designed for near-field monitoring with flat frequency response for mixing and mastering. Each speaker contains its own amp(s) matched to the drivers.
  • Powered PA speakers: Offer onboard amplification and processing, used for quick setup and live sound reinforcement. They often include DSP for EQ, limiting, and speaker protection.
  1. Headphone amplifiers and DAC/amp combos
    Especially for personal listening and portable setups, headphone amps improve dynamics, volume headroom, and sound quality.
  • Portable headphone amps: Small battery or USB-powered devices that boost headphone performance for phones or laptops.
  • Desktop DAC/amp combos: Convert digital audio to analog (DAC) and amplify it. These are common for home desktop listening, offering both better conversion and stronger driving power than integrated sound cards.
  1. Class distinctions: A, AB, D, G, H, etc. — what they mean
    Amp “classes” describe the amplifier topology and affect efficiency, heat, and sound character.
  • Class A: All output devices conduct during the entire waveform. Best linearity and low distortion, but very inefficient and hot.
  • Class AB: Combines Class A’s linearity near the waveform center and Class B’s efficiency at higher outputs. Popular in hi-fi and pro amps.
  • Class D: Uses high-frequency switching and filtering for very high efficiency and compact size. Modern Class D amps can sound excellent and are ideal for powered speakers and portable systems.
  • Class G/H: Use multiple rails or dynamic rail switching to improve efficiency compared to AB while maintaining good sound quality.
  • Other classes (B, C, T): Less common in audio playback; C is used in RF amplifiers, T is a marketing term for certain switching designs.
  1. Special-purpose amplifiers
    Some amps serve niche roles or add features beyond simple amplification.
  • Tube preamps and power sections: Tube preamplifiers or power amp sections are used in hi-fi or guitar rigs to add harmonic character.
  • Instrument-specific preamps: Mic preamps for studio microphones, DI boxes with preamp sections for instruments, and microphone-powered small preamps.
  • Hybrid amps: Combine tube preamp sections with solid-state power sections to get tube warmth with modern reliability.
  • Modeling and profile amps: For guitarists who want digital capture of amp characteristics (IRs and profiles) and tone-shaping tools for studio and live use.
  1. How to choose the right amp — checklist
    This short checklist answers common search intent: people want a simple way to pick an amp.
  • Define purpose: home listening, studio monitoring, live PA, instrument practice, or gigging.
  • Match power to needs: For small rooms, 10–50 watts may suffice for guitar combos; for larger venues, you’ll need more power or a PA. Speaker sensitivity matters for actual loudness.
  • Consider tone preference: Warm and dynamic (tube), clean and reliable (solid-state), or versatile and preset-rich (modeling).
  • Portability and weight: Tube and AB amps are heavier; Class D and modeling amps are lighter.
  • Inputs and outputs: Do you need DI out, effects loop, line inputs, USB, or Bluetooth?
  • Budget and maintenance: Tubes require eventual replacement; solid-state and Class D generally need less upkeep.
  • Room acoustics and speakers: An amp can only do so much; good speakers and room treatment affect final sound more than incremental amp tweaks.
  1. Common FAQs people search for
  • Are tube amps better than solid-state? “Better” depends on taste. Tube amps are prized for their character and natural distortion, while solid-state amps are reliable, lighter, and often more affordable.
  • Can I use an amp with any speaker? Only if the amp and speaker impedance and power ratings are compatible. Mismatched impedance can damage equipment.
  • Do powered speakers need an amp? No, powered (active) speakers have amps built in. Passive speakers need an external amp.
  • What wattage do I need? Wattage needs depend on speaker efficiency and room size. Higher wattage gives more headroom and cleaner sound at high volumes.
  • Are Class D amps inferior? No. Modern Class D amps are efficient and can sound excellent; they’re especially useful where weight and heat are concerns.
  1. Quick buying tips for different users
  • Beginner musician: Start with a small combo (20–40W solid-state or modeling) for home practice and portability.
  • Gigging musician: Choose power and portability, consider a head/cabinet for flexibility or a high-watt combo; look for DI outs for PA integration.
  • Home audiophile: Consider separates or a high-quality integrated amp, and focus on speaker matching and room treatment.
  • Home theater builder: Choose an AV receiver with the right number of channels and modern codecs (Dolby Atmos, DTS:X) and HDMI features.
  • Podcaster/streamer: Invest in an audio interface or mixer with quality preamps; headphone amp/DAC combos help with monitoring clarity.
  • Studio engineer: Use accurate active monitors with dedicated monitor amps (or powered monitors), and keep preamps and converters high quality.

Which amp type should you care about?

  • For guitarists: tube, solid-state, or modeling guitar amps depending on tone and budget.
  • For bassists: powerful, clean bass amps that handle low frequencies.
  • For home audio listeners: integrated amps or AV receivers, depending on two-channel vs. home theater needs.
  • For live sound and PA: robust power amplifiers and powered speakers for simplicity.
  • For studios: active studio monitors, quality headphone amps, and precise preamps.

Final practical example

If you’re a beginner guitarist who wants a single solution for practice, recording, and casual gigging: choose a 20–40W modeling combo with USB output and headphone jack. It’s versatile, light, lets you record directly to your computer, and offers amp presets so you can experiment without buying extra gear.

If you want a deeper recommendation tailored to your exact use (room size, instrument, budget), tell me those details and I’ll suggest specific amp types and models that fit.

What Are the Most Common AMP Problems?

Hey there, fellow guitar shredders and casual strummers! If you’ve ever cranked up your amp only to hear a buzz like a swarm of angry bees or a pop that sounds like a firecracker in your practice space, you’re not alone. Guitar amps are the heartbeat of our setups, but they can throw some curveballs. In this post, we’ll dive into the most common guitar amplifier problems with a light-hearted vibe—no tech jargon overload, just straightforward fixes to get you back to rocking out. Whether you’re a weekend warrior or a gigging pro, knowing these quirks can save your sanity (and your wallet).

We’ll break it down by the usual suspects: noisy gremlins, power hiccups, and those sneaky signal issues. Grab your coffee, and let’s troubleshoot like pros!


Noisy Amplifiers: When Your Amp Sounds Like a Haunted House

Nothing kills the groove faster than unwanted noise turning your sweet riffs into a horror movie soundtrack. Hum, buzz, hiss—these are the top noise complaints from guitarists worldwide.


The Classic Ground Hum (That Low 60Hz Drone)

Picture this: you’re laying down a clean chord progression, and suddenly there’s a steady “hummm” like a refrigerator on steroids. This is usually ground loop hum, caused by your amp picking up electrical interference from power outlets or cables.

  • Why it happens: Your guitar pedals, extension cords, or even the venue’s dodgy wiring create loops in the ground path. It’s like your amp is eavesdropping on the house electricity.
  • Quick fixes: Plug everything into the same power strip to break the loop. Try a ground lift adapter (safely, folks—no shocking yourself!). Swap cables for shorter, shielded ones. If it’s persistent, chelation your power supply or use a hum eliminator pedal. Boom—silence restored, and you’re back to sounding like Hendrix.

Pro tip: In live settings, position your amp away from fluorescent lights or dimmers—they’re hum magnets.


High-Pitched Squeals and Feedback

Ever hit a note and watch your amp scream back at you? Microphonic feedback happens when vibrations rattle tubes or components inside, turning your amp into an unintended feedback machine.

  • Common culprits: Worn-out tubes in tube amps, loose speaker cones, or even dust bunnies amplifying vibes.
  • Easy solutions: Lower your gain knob (sorry, metalheads). Tap the tubes gently—if one squeals, it’s time for a swap. For solid-state amps, check for loose screws or debris. A quick vacuum (amp off!) often does wonders.

Humor alert: If your amp’s feedback is this bad, maybe it’s just jealous of your solos.


Hiss and White Noise on High Gain

Crank the gain for that overdriven bliss, and out comes a constant “sssssh” like a snake convention. This is thermal noise or poor component shielding.

  • Causes: Aging capacitors, cheap cables, or single-coil pickups loving the interference.
  • Fixes: Clean your pots and jacks with contact cleaner—twist those knobs like you’re tuning in a radio station. Upgrade to noise gates or better pedals. Low output pickups? Switch to humbuckers for instant hush.

With these tweaks, your amp goes from chatty to chill in minutes.


Power Problems: When Your Amp Ghosts You Mid-Jam

Power issues are the drama queens of amp troubles. One minute it’s blasting, the next—poof! Dead as a doornail. Let’s zap these back to life.


Won’t Turn On or Powers Off Randomly

You’ve got the pedal steel ready, flip the switch… nothing. Or worse, it cuts out after 20 minutes of glory.

  • Top reasons: Faulty power cord (frayed from too many stage dives), blown fuse, or a tired power transformer.
  • DIY detective work: Inspect the cord for cuts—replace if sketchy. Pop the back panel (unplugged!) and check the fuse; swap with the right amp rating. If it’s thermal shutdown, let it cool and ensure vents are dust-free. Fans clogged? Clean ’em out.

Light-hearted nudge: Treat your amp like a picky eater—give it clean power and space to breathe.


Distorted or Weak Power Output

Sounds like it’s running on fumes? Weak volume or muddy distortion even at full tilt points to power supply woes.

  • Culprits: Sagging power tubes, bad diodes, or electrolytic capacitors drying out from years of abuse.
  • Solutions: For tube amps, bias your tubes properly (or take it to a tech). Test speakers with a multimeter—blown voice coils kill output. Fresh caps can revive old beasts, but if you’re not handy, hit up a repair shop.

Fun fact: Many “dead” amps just need a $5 fuse. Don’t toss it yet!


Startup Pops and Thumps

That heart-stopping POP when powering on? It’s like your amp’s saying “surprise!” Usually from inrush current or switch arcing.

  • Fixes: Use a variac for slow startups on vintage gear. Add a power soak or soft-start mod. Clean the power switch—grime causes arcs.

These power gremlins fixed, and your sessions stay uninterrupted.


Sound and Signal Shenanigans: Clarity Goes Poof

Your amp powers up fine, but the tone? Meh. Distorted channels, dead inputs—these signal path problems sneak up like bad stage lighting.


No Sound or Weak Output from One Channel

Guitar in, knobs up, silence from the clean channel. Classic input jack or preamp tube fail.

  • Why: Dirty jacks, broken switch (push-pull pots), or cold solder joints.
  • Troubleshoot: Plug into different inputs—swap cables too. Deoxit those jacks. Wiggle the plug—if intermittent, it’s the jack. Tube amps? Swap preamp tubes front to back.

Gig saver: Carry spare cables and a mini toolkit.


Fizzly or Crackly Distortion

Instead of creamy overdrive, you get fizzy breakup like cheap soda. Often EQ imbalance or dying output tubes.

  • Causes: Mismatched tubes, speaker impedance wrong, or pot taper worn.
  • Remedies: Match tubes by brand/code. Check speaker ohms against amp specs (4, 8, 16?). Clean/replace volume pots—crackle-free bliss awaits.

Intermittent Cutouts or Motorboating

Putt-putt-putt like a boat engine? Oscillation from bad grounding or tube microphonics.

  • Quick wins: Reseat tubes and tubes. Tighten chassis screws. Ground your guitar strap if metal.

Tube Troubles: The Rockstar Drama of Valve Amps

Tube amps have soul, but tubes are divas. Red-plating (glowing like cherries), rattling, or sudden death plague them.

  • Symptoms: Loss of highs (worn tubes), low end rumble (microphonics), or breakup too early.
  • Maintenance 101: Replace power tubes every 1,000-3,000 hours. Use matched sets. Bias correctly—hot bias shortens life, cold bias sounds flat.
  • Pro move: Keep spares in your gig bag. Matched JJ or Tung-Sol tubes are wallet-friendly reliables.

Solid-state fans, rejoice—you skip this drama, but envy the warmth.


Speaker Woes: When Cones Give Up the Ghost

Speakers take the brunt—literally. Blown cones from overdriving or cone tears from dust.

  • Signs: Rattles, farting sounds, or voice coil rub (scrape on play).
  • Fixes: Inspect cone—patch small tears with tissue and glue. Full re-cone for big damage. Match impedance religiously when replacing.
  • Prevention: Use attenuators for bedroom volumes. Dust regularly.

Upgrade to Celestion V30s for punchy resilience.


Overheating and Safety Scares

Amps sweating like you after a set? Vents blocked, tubes too close, or failing filter caps.

  • Avoid disaster: Place on carpet? Elevate it. Tube cages help. Smell burning? Unplug NOW—could be resistors frying.
  • Long-term: Recap every 10-15 years. Techs charge $100-300, worth every penny.

Prevention Tips to Keep Your Amp Happy

Don’t wait for problems—stay ahead:

  • Cable care: Coiled cables? Unravel to avoid memory.
  • Environment: No humid garages or attics—moisture kills.
  • Power protection: Surge protectors save lives (amp lives).
  • Regular checks: Annual once-over by a tech.

Store properly: Covers on, upright.


Wrapping Up the Amp Saga

There you have it—the most common guitar amplifier problems demystified, from buzzes to busts. With these tips, you’ll spend less time wrenching knobs and more time wailing leads. Your amp’s not broken; it’s just cranky. A little TLC, and it’s your best buddy again.

Got a specific amp model acting up? Drop a comment—we’ll riff on it! Rock on, friends.

How to Test if a Guitar Amp Is Good: A Simple Guide for You

When you want to find out if a guitar amp is good, you need to know what to listen for and what to look at. Testing a guitar amp means checking its sound quality, power, features, and how it handles different settings. This guide will help you easily test a guitar amp and decide if it suits your style and needs.


Understand the Sound Quality

The sound quality is the most important part when testing a guitar amp. You want the amp to sound clear, rich, and responsive to your playing. Here’s how to check the sound:

  • Plug in your guitar and play different styles. Strum chords, play single notes, and try some bends or slides. Pay attention to how the amp reacts to each.
  • Listen for clarity. A good amp makes every note stand out without muddiness or harshness.
  • Test different volume levels. Start low and slowly increase. The amp should stay clear and not distort unless you want distortion at high volume.
  • Try clean and distorted settings. Many amps let you switch to distortion or overdrive. See how natural or smooth the sound is when you add gain.
  • Check for noise or hum. Turn the volume up and listen carefully. A good amp won’t have annoying background noise when you’re not playing.

Evaluate the Power and Volume

Next, look at the power and volume because you need to know if the amp can fill the room or venue you play in. Here’s how to test it:

  • Check the wattage rating. Higher watts usually mean louder sound, but your amp size should match your playing space.
  • Turn the volume to max and see if it distorts badly. Some amps sound better when pushed hard; others lose tone and get messy.
  • See how the amp handles dynamics. Play softly then loudly, and listen if it keeps the tone balanced.
  • Consider portability if you plan to gig. A good amp should be powerful enough but still easy to carry if needed.

Test the Amp’s Features and Controls

A good guitar amp gives you enough control to shape your sound. Test these parts to see how user-friendly and effective they are:

  • Try the tone controls (bass, mid, treble). Adjust each one and listen how the sound changes. A good amp lets you easily shape your tone.
  • Check any built-in effects. Some amps include reverb, delay, or chorus. Test these effects to see if they add to your sound or feel cheap.
  • Use multiple input options. Test the headphone jack, auxiliary input, or any other ports. Make sure they work well for practice or recording.
  • Look for output options. If you want to connect to speakers or recording gear, check these connections.
  • Feel the build quality and knobs. The controls should feel solid and not loose. The amp should look sturdy.

Additional Tips for Testing Your Guitar Amp

  • Bring your guitar cable. Sometimes poor tone comes from a bad cable, not the amp.
  • Test with different guitars if you can. This shows how versatile the amp is.
  • Play with settings beyond default. Try unusual combos to see if the amp handles changes well.

How to Know if the Amp Is Good for You

A good guitar amp suits your playing style, sounds clear at different volumes, offers useful controls, and is reliable. By testing sound quality, power, and features like this, you get a clear idea of its quality. Now, you’re ready to find the amp that will let your music shine.

How to Choose the Right Guitar Amplifier

Choosing the right guitar amplifier can completely change how you sound and feel when you play. With so many options available, it might seem overwhelming at first. But don’t worry; by focusing on what really matters for your style and needs, you can find an amp that suits you perfectly. This guide will walk you through the key points so you can pick the best guitar amplifier with confidence.


Understand Your Playing Style and Goals

Before you dive into the technical details, think about what kind of music you want to play and where you will use the amp most often. Do you play at home, in a studio, or on stage? Are you into clean sounds, heavy distortion, or something in between? Knowing this helps narrow down your choices.

If you mostly play at home, a smaller, lower-watt amp might be perfect. These amps are usually lighter and won’t disturb the neighbors. For live performances, you’ll want something louder with more power and better projection. Also, consider whether you want a simple amp to plug in and play or one with lots of built-in effects like reverb and delay.


Know the Types of Guitar Amplifiers

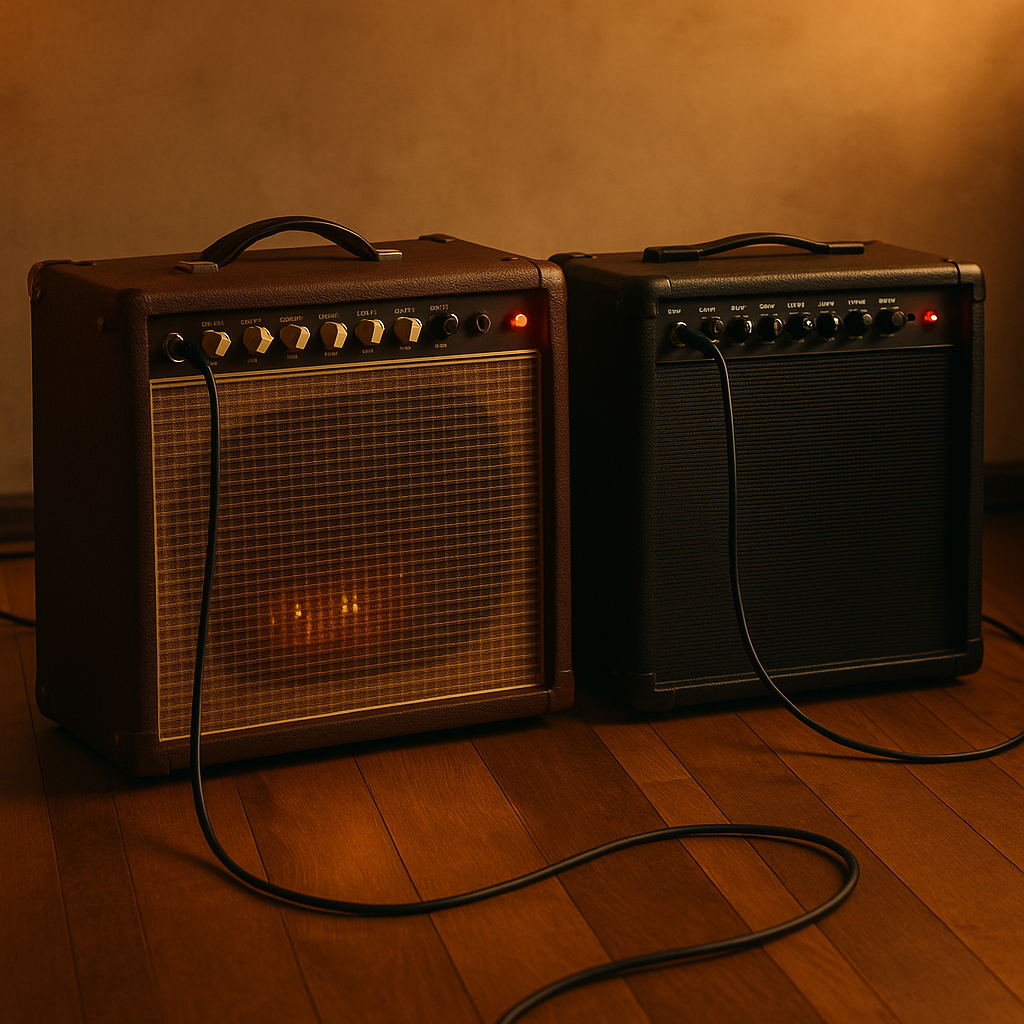
Guitar amps mainly come in three types: tube, solid-state, and hybrid. Each type has its sound and feel.

  • Tube Amps: These use vacuum tubes to amplify the sound and are known for warm, rich tones. Many guitarists love how tube amps respond to playing dynamics. They tend to be heavier and require more maintenance but offer a classic sound preferred for blues, rock, and jazz.
  • Solid-State Amps: These use transistors instead of tubes. They are typically more affordable, reliable, and lightweight. Solid-state amps deliver a cleaner sound and are great if you want consistency and less upkeep. They work well for beginners and for styles like pop or country.
  • Hybrid Amps: Hybrid amps combine tube preamps and solid-state power amps. This means they give you some warmth and character from tubes but keep the reliability and lower cost of solid-state. They can be a good middle ground.

Focus on Power and Size Based on Your Needs

The wattage of the amp tells you how loud it can get. For bedroom playing or practice, 10 to 20 watts is usually enough. These amps still sound great at low volumes, letting you enjoy rich tones.

If you play in a band or small gigs, look for amps between 30 and 50 watts. They are louder and can fill a small venue without needing extra speakers. For larger shows, 50 watts and above will deliver the power you need, and you may also consider external speaker cabinets.

Keep in mind that bigger amps are usually heavier, so if portability is important, try to find a balance between power and weight. Also, look for features like headphone jacks if you want silent practice time.


Pay Attention to Speaker Size and Cabinet Type

The speaker size impacts the tone and volume of your amp. Common sizes are 8, 10, 12, and 15 inches. Larger speakers generally produce more bass and volume, while smaller ones offer tighter lows and more focused mids.

Most guitarists prefer a 12-inch speaker in their amp. It offers a balanced sound good for many music styles. If you like heavy bass tones, a 15-inch speaker might suit you better. Smaller speakers like 8 or 10 inches are often found in portable practice amps.

Cabinet design also matters. Open-back cabinets spread the sound and give a roomy feel, making them popular for clean tones and jazz. Closed-back cabinets focus the sound forward for more punch and are great for rock and heavier styles.


Think About Features and Connectivity

Modern amps have plenty of extra features that can be very useful. Look for built-in effects such as reverb, delay, chorus, or distortion if you want something ready to go without extra pedals. Some amps even include amp modeling technology, giving you many amp tones in one unit.

Connectivity options like USB or AUX inputs let you connect your amp to your computer or phone. This is ideal if you want to record or play along with music. Also, a headphone output is helpful for practicing quietly.

If you plan to use your amp with pedals, check if it has an effects loop. This allows you to place pedals between the preamp and power amp sections for better sound quality.


Consider Your Budget and Longevity

Amplifiers can range widely in price, but remember that expensive doesn’t always mean better for your needs. Choose an amp that fits your budget and covers your basic requirements. If you’re just starting out, a solid-state practice amp can be very affordable and reliable.

Think long term. If you plan to grow as a guitarist, investing in a good tube amp might pay off because of its rich tone and upgrade potential. Buying a used amp from a trusted seller can also be a smart way to get high-quality sound without spending too much.


Try Before You Buy If Possible

Nothing beats testing amps in person. Visit a music store and play through different models. Pay attention to how each amp feels and sounds to you.

Try your own guitar instead of just listening to the store’s demo guitars. This will give you a better idea of how your tone changes with each amp. Also, bring headphones if you want to check practice amps privately.

If you can’t visit in person, look for demo videos online to hear real examples. Reviews and forums from other guitarists can also help guide you.


Easy Maintenance Tips for Your Amplifier

To keep your amp working well, avoid exposing it to moisture or extreme temperatures. Store it in a dry place and unplug it when not in use.

For tube amps, tubes wear out over time and need replacing every few years. Watch for changes in tone or volume, which might signal that tubes need servicing.

Clean the amp’s exterior regularly and keep cables in good condition. Proper care helps you enjoy your amp for many years.


Summary

By knowing your playing style, amp types, power needs, and preferred features, you can select the perfect guitar amplifier. Remember to try different amps, consider your budget, and think about where you will play most. With this knowledge, you’ll find an amp that makes you want to pick up your guitar and play every day.

What Usually Fails in an Amplifier?

When your amplifier stops working or doesn’t sound quite right, it can be frustrating. But do you know what usually fails inside an amplifier? Understanding common amplifier failures can help you identify problems faster and maybe even save repair costs. Let’s take a closer look at the usual culprits that cause amplifiers to fail, whether you’re dealing with a guitar amp, home audio amplifier, or any other type.


Common Components That Fail in Amplifiers

Amplifiers are a mix of electronic parts working together to boost sound signals. Even though they are built strong, some parts tend to wear out or break over time. Here are the most common components that usually fail:

Capacitors – The Usual Suspects

Capacitors store and release electrical energy inside your amplifier. They help smooth out the sound signal and power flow. After a few years, capacitors can dry out, leak, or bulge, which causes poor performance or total failure. If your amp starts to hum, crackle, or loses power, bad capacitors may be the reason.

Transistors and ICs – Amplifier Powerhouses

Transistors and Integrated Circuits (ICs) amplify the sound signals. They deal with a lot of current under heat stress. If they get too hot or receive a power spike, they can burn out or short circuit. When this happens, your amp might cut out sound completely or sound distorted and weak.

Resistors and Diodes – Small Parts, Big Role

Resistors control electrical flow, while diodes protect against voltage spikes. Usually, they don’t fail often but can sometimes burn out if the amp gets overloaded or overheats. Broken resistors or diodes can cause your amplifier to behave erratically or fail to turn on.

Potentiometers and Switches – The User Controls

These are the knobs and switches that control volume, tone, and power. Dirt, dust, or wear and tear can cause them to become scratchy, unresponsive, or broken. If your volume knob is crackling or the amp doesn’t switch on properly, these parts may be the problem.


Why Do Amplifier Parts Fail?

Now that you know which parts fail the most, you might wonder why they break in the first place. Amplifiers face several conditions that speed up failure:

Heat Stress

Amplifiers generate a lot of heat because they push power through electronic components. If they’re poorly ventilated or used for long hours at high volume, the heat can damage sensitive parts like transistors and capacitors.

Power Surges and Overload

Sudden spikes in electricity, like lightning strikes or unstable power sources, can fry amplifier parts. Using an amplifier beyond its rated capacity can also overload internal components, causing them to fail.

Age and Wear

Over time, even the best amplifier parts suffer from natural wear. Capacitors dry out, solder joints crack, and moving parts like switches wear down. Regular use and age often lead to slow degradation.

Environmental Factors

Moisture, dust, and dirt can seep into your amplifier and cause corrosion or dirty connections. If you don’t clean and maintain your amp, these elements can make components fail prematurely.


Signs That Tell You What Might Be Wrong

Want to know if your amplifier is giving you clues about failing parts? Here are typical symptoms and what they usually mean:

  • No sound or very low volume: This often means a blown fuse, faulty power supply, or broken transistors.
  • Distorted or fuzzy sound: Could be bad capacitors, worn-out tubes (in tube amps), or blown speakers.
  • Crackling or popping noises: Usually dirty potentiometers or failing capacitors.
  • Amplifier shuts off randomly: Overheating or power supply problems.
  • Burning smell or smoke: A serious sign of component failure, often transistors or resistors overheating.

If you notice any of these signs, it’s best to turn off your amplifier and have it checked to avoid further damage.


Knowing what usually fails in an amplifier helps you troubleshoot issues and keep your sound equipment working longer. If your amplifier shows strange noises, heat issues, or power problems, check the capacitors, transistors, and user controls first. Regular maintenance and careful use can prevent many common failures.

7 Steps on How to Check if a Guitar Amplifier Is Working

So, you’ve got a guitar amplifier and you’re not sure if it’s working properly. Maybe you’re new to the world of electric guitars, or perhaps you’ve just dusted off an old amp from the attic. Whatever the reason, you want to make sure your amp is in good shape before you start jamming. Don’t worry—you’re in the right place! This guide will walk you through easy, step-by-step instructions to check if your guitar amplifier is working, even if you’re not a tech wizard.

Why You Should Check Your Guitar Amplifier

Before you plug in and crank up the volume, it’s important to make sure everything is working as it should. A faulty amp can ruin your practice session, damage your guitar, or even pose a safety risk. By learning how to check your amp, you’ll save yourself time, money, and frustration. Plus, you’ll feel more confident every time you play.

What You Need Before You Start

You don’t need a toolbox full of gadgets to check your amplifier. Here’s what you should have on hand:

  • Your guitar amplifier (of course!)
  • An electric guitar
  • A working guitar cable (instrument cable)
  • Access to a power outlet
  • A pick (optional, but helpful)
  • A little patience and curiosity

If you have these items ready, you’re set for a smooth troubleshooting session.

Step 1: Visual Inspection—Start With the Basics

Let’s begin with the easiest checks. Sometimes, the problem is right in front of you!

Check the Power Source

  • Make sure your amplifier is plugged into a working power outlet. Try plugging in another device, like a lamp, to confirm the outlet works.
  • Look at the power cable for any obvious damage, fraying, or loose connections.
  • If your amp has a power switch, flip it on and see if any lights come on. Most amps have a power indicator light.

Inspect the Amplifier

  • Check the amp’s exterior for any signs of damage, like dents, cracks, or missing knobs.
  • Make sure all the control knobs (volume, gain, bass, treble, etc.) are present and can turn smoothly.
  • Look at the input jacks and speaker grill for dust, debris, or anything blocking the connections.

Examine Your Guitar Cable

  • Use a cable you know works. If you’re not sure, try it with another amp or instrument.
  • Check both ends of the cable for bent or broken plugs.

If everything looks good so far, you’re ready to move on to the next step.

Step 2: Powering Up—Let’s Get Things Going

Now, let’s see if your amp comes to life!

Turn On the Amplifier

  • Plug your amp into the outlet and turn it on.
  • Listen for a soft “pop” or hum, which is normal when an amp powers up.
  • Look for any indicator lights or backlighting on the control panel.

If your amp doesn’t power on, double-check the power cable, outlet, and any fuses or circuit breakers. Some amps have a fuse that can blow and prevent them from turning on. If you suspect a blown fuse, consult your amp’s manual or seek help from a professional.

Set the Controls

  • Turn the volume and gain controls to a low setting. This prevents loud surprises.
  • Set the EQ knobs (bass, middle, treble) to their middle positions.
  • Make sure the “standby” switch is set to “play” if your amp has one.

Plug In Your Guitar

  • Connect one end of the cable to your guitar and the other to the amp’s input jack.
  • Make sure both connections are snug.

Step 3: The Sound Test—Let’s Make Some Noise

Here’s the fun part! You’re about to find out if your amp is working.

Strum Your Guitar

  • Play a few notes or chords and listen for sound coming from the amp’s speaker.
  • Start with the volume low, then gradually increase it to a comfortable level.

What Should You Hear?

  • Working Amp: You should hear your guitar’s sound amplified, clear and free from crackling or buzzing.
  • No Sound: If you don’t hear anything, try adjusting the volume and gain controls.
  • Strange Noises: If you hear static, buzzing, or crackling, there may be a loose connection or a problem with the cable or amp.

Troubleshooting Tips

  • Try a different cable or guitar to rule out those as the source of the problem.
  • Wiggle the cable gently at both ends. If the sound cuts in and out, the cable might be faulty.
  • Check the amp’s headphone jack (if it has one) by plugging in headphones and listening for sound.

Step 4: Advanced Checks—Digging a Little Deeper

If your amp still isn’t working, don’t panic! There are a few more things you can try before calling in the experts.

Check the Speaker

  • Listen closely to the speaker for any faint sounds or vibrations.
  • If you have an external speaker output, try connecting to another speaker to see if the issue is with the built-in speaker.

Inspect the Tubes (For Tube Amps)

  • If you have a tube amplifier, look through the back panel for glowing tubes when the amp is on.
  • Tubes that don’t light up or look dark may need replacing.
  • Be careful—tubes get hot! Don’t touch them while the amp is on.

Test the Fuses

  • Some amps have accessible fuses that can blow and stop the amp from working.
  • If you’re comfortable, check the fuse and replace it with one of the same rating if it looks burned out.
  • If you’re unsure, it’s best to ask a professional for help.

Try Different Settings

  • Try plugging into different input jacks if your amp has more than one.
  • Experiment with the amp’s built-in effects or switches to see if any setting produces sound.

Step 5: Common Problems and Easy Fixes

Let’s go over some common issues and how you can fix them quickly.

ProblemPossible CauseWhat You Can Do
No powerBad outlet, blown fuseTry another outlet, check fuse
No soundFaulty cable, bad jackReplace cable, try other jack
Distorted soundDirty pots, bad cableClean knobs, replace cable
Crackling noiseLoose connectionCheck and tighten connections
No lightsPower issueCheck power cable and switch

Step 6: When to Seek Professional Help

Sometimes, despite your best efforts, your amp just won’t cooperate. Here’s when you should call in the pros:

  • You’ve checked everything above and still get no sound or power.
  • You smell burning or see smoke coming from the amp.
  • The amp makes loud popping or hissing noises even when nothing is plugged in.
  • You’re not comfortable opening the amp to check fuses or tubes.

Professional technicians can diagnose and repair issues safely. Don’t risk damaging your amp or hurting yourself by poking around inside if you’re unsure.

Step 7: Keeping Your Amp Healthy

Prevention is better than cure! Here are some quick tips to keep your amplifier in top shape:

  • Store your amp in a dry, cool place away from direct sunlight.
  • Clean the exterior regularly with a soft cloth to prevent dust buildup.
  • Don’t overload the amp with too many pedals or effects at once.
  • Use a surge protector to guard against power spikes.
  • Have your amp serviced by a professional every couple of years, especially if you play often.

Frequently Asked Questions

Can I test my amp without a guitar?

Yes! You can use a phone or MP3 player with a 1/4-inch adapter to play music through the amp. This helps you check if the speaker and electronics are working.

Is it safe to open my amp?

If you’re not experienced with electronics, it’s best to leave the inside of your amp to the professionals. Amps can store dangerous voltages even when unplugged.

Why does my amp make a humming sound?

A low hum is normal, but loud humming could mean a grounding issue or a bad cable. Try plugging into a different outlet or swapping cables.

My amp works but sounds weak—what’s wrong?

Weak or thin sound can be caused by low batteries in active pickups, dirty controls, or a failing tube (in tube amps).

Final Thoughts

Checking if your guitar amplifier is working doesn’t have to be complicated. With a little patience and these simple steps, you’ll quickly figure out if your amp is ready to rock or needs a little TLC. Remember, most problems have easy fixes, and you’ll get better at troubleshooting with practice. So grab your guitar, plug in, and let the music flow!

Happy playing!

Tube Amps vs. Solid State: Which Sounds Better for You?

You’ve probably heard guitarists passionately debate tube amps versus solid state. It’s not about one being universally “better”—it’s about what suits your style, budget, and preferences. Tube amps use vacuum tubes to shape sound, creating warm, dynamic tones that respond to your playing. Solid state amps rely on transistors and circuits, delivering clean, consistent sound at any volume. Both excel in different scenarios, and your choice depends on what you value most: vintage warmth or modern reliability. Let’s break it down so you can decide what’s right for your sound.

Sound Quality: Feel the Difference

Tube amps give you that classic, harmonically rich tone. Crank the volume, and they distort musically—like a smooth breakup that adds soul to blues or rock solos. They respond to your touch; dig in hard, and the sound growls. Play softly, and it stays clean. This dynamic feel makes every note feel alive and emotional, perfect when you want your playing to express nuance.

Solid state amps keep things crisp and clear. Even at max volume, you get zero natural distortion—ideal for jazz, metal, or keyboards where note clarity matters. They’re consistent: your tone stays the same whether you’re practicing quietly or gigging loudly. No surprises, just precision across all frequencies.

Practical Perks: Maintenance, Cost, and Features

Tube amps need more love. Tubes wear out and must be replaced every few years. They’re fragile (glass tubes break!) and pricier upfront. But many players swear it’s worth it for that organic sound.

Solid state amps win for hassle-free use. No tubes to replace means lower long-term costs. They’re tougher for gigging and often cheaper upfront. Plus, you get built-in extras like effects, EQ controls, or multiple channels. Want heavy distortion at bedroom volume? Solid state nails it.

Which Genres and Players Shine?

  • Tube amps are the darlings of blues, classic rock, and indie. If you crave touch-sensitive dynamics and “vintage vibe,” tubes deliver.
  • Solid state amps suit metal, jazz, or pop players. Need crystal-clear chords or tight distortion? Solid state keeps every note articulate.

The Verdict

Try both if you can. Love responsive, warm, organic sound? A tube amp might be your soulmate. Prefer reliability, affordability, and pristine clarity? Go solid state. Your playing style—not myths—should guide you. After all, great tone comes from your fingers, not just your amp.